NUCLEUS Rotosonic DX1
Ultrasonic Welding Machine - Training & Operating Guide
Introduction
▼What is Ultrasonic Welding?
Ultrasonic welding connects thermoplastic materials through internal friction, heating, and fusion. The weld strength depends on three key parameters: power, pressure, and time.
How it Works:
The process converts standard 50 Hz electrical power into 35 kHz ultrasonic frequency. This high-frequency energy becomes mechanical vibrations that create friction between materials. As the sonotrode oscillates against the anvil wheel, the material heats up and forms a plasticized layer. Simultaneous pressure from the wheels strengthens the bond as the material cools.
Material Requirements:
Only thermoplastic materials can be welded effectively. The best results require materials with at least 60% synthetic fibers.
Quick Material Test
Hold a small sample near a flame. If it melts, it can likely be welded. If it burns or chars without melting, it's not suitable for ultrasonic welding.
Training Manual
▼⚠️ Important Note
All welding machine settings are fundamentally dependent on the specific properties of the material to be welded. The optimum values must be determined by means of test welds.
Finding the Right Parameters
The main challenge is determining the correct settings for your specific material. Each material requires testing to find optimal parameters. Once established, production becomes straightforward.
Step 1: Material Check
Ensure your material is thermoplastic, has suitable thickness for the DX1, and the seam area is clean.
Step 2: Start with Baseline
Begin with 40W power and 40N pressure at moderate speed, then test and adjust incrementally.
Adjustment Guide:
Weak seam: Increase power, increase pressure, or decrease speed
Material burning: Decrease power, decrease pressure, or increase speed
Change one parameter at a time to understand its effect.
Document Your Settings
Record material type, thickness, final power/pressure settings, welding speed, and wheel configuration for future reference.
Step-by-Step Welding Tutorial
▼⚠️ Important: Material Thickness Selection
Select the appropriate guide based on the thickness of the plastic you are working with:
- Thin Plastics: Less than 1mm thickness
- Middle Plastics: 1-3mm thickness
- Thick Plastics: Greater than 3mm thickness
Step 1: Machine Setup
Before beginning any welding operation, proper machine setup is critical for achieving consistent results. Start by ensuring the machine is properly connected to power and verify that the ultrasonic generator is turned on and functioning correctly. The next crucial step is selecting and installing the appropriate anvil wheel - this choice significantly affects the quality of your weld and should be based on both your specific application requirements and the thickness of the material you'll be working with. If you're uncertain about which wheel to use, consult the manufacturer's recommendations or refer to previous successful projects with similar materials. Once the wheel is installed, carefully load your material into the machine, paying close attention to proper alignment and ensuring the material is appropriately tensioned - uneven tension or misalignment can result in inconsistent welds or material damage.
Step 2: Initial Parameter Setup
Setting the correct initial parameters is one of the most important steps in the welding process. If you're working with a new material that you haven't welded before, it's always best to start conservatively with settings on the lower end of the recommended range for your material thickness. This cautious approach helps prevent material damage while you learn how the specific material responds to ultrasonic welding. The three key parameters you'll need to configure are power (measured in watts), pressure (expressed as a percentage of maximum), and welding speed (measured in meters per minute). Each material thickness category has its own recommended starting ranges:
Thin Plastics (< 1mm)
- Power: 10-20 watts
- Pressure: 5-15% of maximum
- Speed: 1-2 m/min
Medium Plastics (1-3mm)
- Power: 20-30 watts
- Pressure: 10-20% of maximum
- Speed: 1-2 m/min
Thick Plastics (> 3mm)
- Power: 30-50 watts
- Pressure: 20-40% of maximum
- Speed: 1-2 m/min
Helpful Tip: If you're welding a material similar to one you've worked with previously, you can save time by starting with those previously successful settings as your baseline, then make minor adjustments as needed for your current application.
Step 3: Test Welding
Once you've configured your initial parameters, it's time to perform a test weld to evaluate how your material responds. Begin the welding process by activating the machine using either the foot pedal or the start button, depending on your machine's configuration. During this initial test, careful observation is crucial - watch the welding process closely, looking for visual indicators such as signs of melting at the seam, evidence of bonding between the material layers, and any unwanted material distortion or damage. After running a short test weld (typically just a few centimeters is sufficient), stop the process so you can evaluate the results without wasting material.
Step 4: Evaluate Weld Quality
The evaluation phase is where you determine whether your initial settings are appropriate or need adjustment. Start with a thorough visual inspection of the test weld, examining it for consistency along its entire length, checking for uniformity in the weld seam, and looking for any signs of damage such as tears, excessive melting, or burn marks. After the visual inspection, perform a physical peel test to assess the actual strength of the weld - gently try to separate the welded materials to gauge how well they've bonded. The results of this evaluation will determine your next steps: if the weld appears weak, inconsistent, or shows poor bonding, you'll need to proceed to Step 5 to adjust your parameters. However, if the weld demonstrates good strength, appears consistent throughout, and shows proper bonding without damage, you can skip ahead to Step 7 to optimize and save your settings.
Step 5: Adjust Power and Pressure
When your test weld shows signs of weakness or inconsistency, the first parameter to adjust is typically the power setting. Make small, incremental increases to the power level - the size of these increments should be proportional to your material thickness. For thin plastics (less than 1mm), increase power by 2-5 watts at a time; for medium plastics (1-3mm), use increments of 5-10 watts; and for thick plastics (greater than 3mm), also increase by 5-10 watts per adjustment. After each power adjustment, run another test weld to evaluate the improvement.
However, if you observe excessive melting, burning, or material damage during your test welds, this indicates that you have too much power. In this case, reduce the power setting accordingly, again making incremental changes to avoid overcorrection. The goal is to find the sweet spot where you have enough energy to create a strong bond without causing damage to the material.
If you've increased the power to near the upper limit recommended for your material thickness and the weld is still showing signs of weakness, it's time to start adjusting the pressure instead. Pressure adjustments should also be made incrementally and in proportion to your material thickness: for thin plastics, increase pressure by 2-5% of maximum at a time; for medium plastics, use 5-10% increments; and for thick plastics, also adjust by 5-10%. Remember to test after each adjustment to evaluate the results.
⚠️ Critical Safety Note: Be extremely cautious when increasing pressure, as excessive pressure can cause the plastic to distort, tear, or create stress points that compromise the integrity of your finished piece. If you notice any material deformation, reduce the pressure immediately and reassess your approach.
Step 6: Adjust Welding Speed and Design
If you've optimized both power and pressure settings but still aren't achieving consistent, strong welds, it's time to consider adjustments to your welding speed and potentially the design of the weld itself. Sometimes the issue isn't about how much energy you're applying, but rather how long that energy is being applied to the material.
First, try reducing your welding speed by 0.5 to 1 meter per minute. This slower speed allows the ultrasonic energy more time to penetrate and heat the material, which can be particularly beneficial for materials that are slow to respond to heating or when working with thicker cross-sections. After adjusting the speed, run another test weld to see if the additional bonding time improves the weld quality.
If speed adjustments don't solve the problem, consider redesigning the weld itself. One effective approach is to increase the overlap area of the weld, creating a larger bonding surface that distributes stress more effectively. Another technique is to use a fold-over or hem design where you fold the material back on itself at the weld point, effectively doubling the thickness and creating a stronger joint. These design modifications can dramatically improve weld strength without requiring any changes to your machine parameters.
For particularly thick plastics (greater than 3mm), if a single welding pass isn't providing sufficient bonding throughout the material depth, you might need to employ multiple welding passes. This technique allows you to build up the weld strength gradually, with each pass contributing to the overall bond without overheating or damaging any single layer of the material.
Step 7: Optimize and Save Settings
Once you've successfully achieved a strong, consistent weld that passes both visual inspection and strength testing, take the time to fine-tune your settings for optimal results. Make small adjustments to power, pressure, and speed as needed to achieve the best possible weld quality while using the minimum necessary energy and resources - this not only improves efficiency but also extends the life of your equipment and reduces material stress.
An important technical checkpoint at this stage is to verify that your amplitude setting is within the optimal 60-90% range. This range provides the best balance of power control and welding efficiency - settings below 60% may not provide enough energy for consistent welds, while settings above 90% can cause excessive wear on the machine components and may damage sensitive materials.
Finally, and critically important for future efficiency, save your optimized settings as a program recipe in the machine's memory. Make sure to clearly label this recipe with detailed information including the material type, manufacturer (if applicable), thickness, and any other relevant characteristics. This practice will save you considerable time and effort when you need to weld this same material in the future, as you'll be able to simply load the recipe and begin production immediately rather than repeating the entire parameter optimization process.
Step 8: Production Welding
With your parameters optimized and saved, you're now ready to begin production welding using these proven settings. However, even with perfect parameters, it's important to maintain vigilance throughout the production process. Materials can have natural variations from batch to batch or even within a single roll, and environmental factors such as temperature and humidity can affect welding performance throughout the day.
Establish a regular inspection routine where you periodically examine the weld quality during production runs. How frequently you inspect will depend on your specific application - for critical applications, you might inspect every few pieces, while for less critical work, inspecting every 15-30 minutes might be sufficient. If you notice any changes in weld quality, don't hesitate to make small adjustments to your parameters to compensate for material variations or environmental changes. This proactive approach helps maintain consistent quality and prevents the accumulation of defective pieces before you notice there's a problem.
Remember: Prioritize safety, refer to the machine manual for detailed instructions, and maintain thorough records for each material and thickness. Experimentation and observation are crucial for achieving the best results when welding plastics of various thicknesses with the NUCLEUS Rotosonic DX1 ultrasonic welding machine.
Safety & Technical Notes
▼Safety Guidelines
- Personal Protection: Always wear appropriate personal protective equipment (PPE) such as safety glasses and hearing protection.
- Hand Safety: Keep hands and fingers away from the welding area during operation to avoid pinching or crushing injuries.
- Electrical Safety: Ensure the machine is properly grounded and all safety features are functioning correctly before use.
Material Compatibility
- Verify that the plastic materials you intend to weld are compatible with ultrasonic welding. Some plastics, such as thermosets or highly filled plastics, may not weld effectively.
- When welding dissimilar materials, ensure they have similar melting temperatures and are chemically compatible to form a strong bond.
Anvil Wheel Selection
- Choose the appropriate anvil wheel for your material and application. The pattern, knurl depth, and diameter of the anvil wheel can significantly affect weld quality.
- Consult the manufacturer's recommendations or conduct testing to determine the best anvil wheel for your specific needs.
Fixture Design
- Use fixturing to ensure consistent alignment and pressure distribution of the materials being welded.
- Proper fixturing can help prevent misalignment, slippage, or uneven welding, particularly for complex part geometries.
Energy Directors
- Consider using energy directors (raised triangular or semicircular protrusions) on one of the mating surfaces to concentrate ultrasonic energy and improve welding efficiency.
- Energy directors are especially useful for welding thick or difficult-to-weld materials.
Horn and Booster Maintenance
- Regularly inspect the ultrasonic horn and booster for wear, damage, or contamination. Clean or replace these components as necessary to ensure consistent welding performance.
- Proper maintenance of the horn and booster is crucial for efficient energy transfer and weld quality.
Calibration and Testing
- Regularly calibrate the machine's power output, pressure, and speed settings to ensure accuracy and consistency.
- Perform routine quality control tests on welded samples to verify weld strength, consistency, and appearance.
Record-Keeping
- Maintain detailed records of the welding parameters, materials, and anvil wheels used for each application.
- Good record-keeping practices facilitate troubleshooting, process optimization, and repeatability.
Training Requirements
- Ensure that all operators are properly trained in the safe and effective use of the ultrasonic welding machine, including setup, operation, troubleshooting, and maintenance.
- Regular refresher training can help maintain operator skills and knowledge.
Seeking Assistance
If you encounter persistent welding issues or have questions about your specific application, don't hesitate to reach out to the machine manufacturer or an experienced ultrasonic welding professional for guidance.
Wheel Configuration
▼Cut & Weld (CW) System
The CW system performs welding and cutting in a single operation. Choose the configuration based on your application needs.
Option A: Welding + Cutting
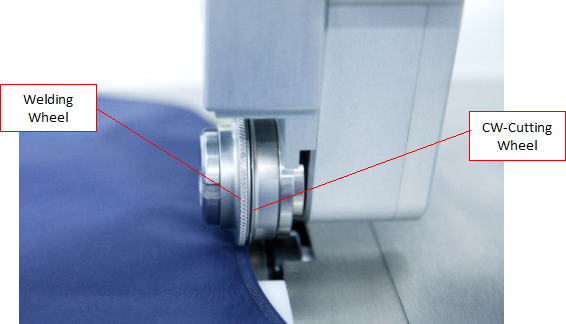
Setup: Welding wheel (left) + CW cutting wheel (right)
Use for: Applications requiring both welding and cutting with independent pressure control for each function.
Option B: Cutting + Transport
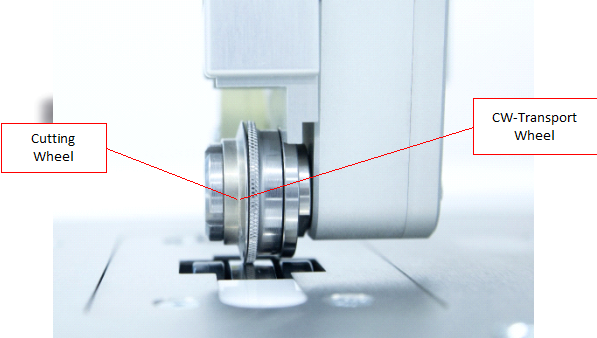
Setup: Cutting wheel (left) + CW transport wheel (right, passive)
Use for: Clean cutting applications where reliable material guidance is essential.
Cutting Angles (15° to 75°)
Lower angles (15°-30°): Less heat, better for thin materials
Higher angles (60°-75°): More heat and plasticization, better for thick materials
Resources
▼Nucleus 2017 Complete Manual
Comprehensive operation manual covering system overview, technical specifications, and detailed operating procedures.
Download Manual (PDF)DX1 Ecoline Documentation
Technical documentation for the DX1 Ecoline variant with simplified operation modes.
Download Documentation (PDF)Support Contact
NUCLEUS Support Hotline: +49 (211) 41555900
Website: www.nucleusultrasonics.com
Frequently Asked Questions
▼What materials can be welded?
Only thermoplastic materials can be welded. Best results are achieved with materials containing a minimum of 60% synthetic fibers. A simple test: materials that melt under direct heat can potentially be welded, whereas materials that burn or char are not suitable.
Can EVA foam be welded?
EVA foam weldability is uncertain and requires testing to determine suitability. Each material must be tested before welding to understand its behavior.
How do I determine the right parameters?
Start with baseline settings (40W power / 40N pressure) and adjust incrementally based on test results. The biggest challenge is determining the correct parameters - this requires systematic testing with your specific material.
Which wheel configuration should I use?
Use Welding + CW Cutting when you want to weld and cut in one operation with separate pressure control. Use Cutting + CW Transport when you need clean cuts with reliable material transport.
What does the cutting angle affect?
Higher cutting angles (60°-75°) create more material plasticization, suitable for thick materials. Lower angles (15°-30°) are better for thin, delicate materials.
Who can I contact for support?
NUCLEUS Support Hotline: +49 (211) 41555900
Website: www.nucleusultrasonics.com
Training Required
The NUCLEUS Rotosonic DX1 requires proper training before use. Contact the Maker Station team to arrange training sessions covering safety protocols, parameter determination, and hands-on operation.
Contact for Training